User Guide of WooTechy iPhixer
As the all-in-one iOS/iPadOS/tvOS repair tool, iPhixer can bring your iPhone/iPad/iPod touch/Apple TV back to normal under different situations with the highest success and safety rates. Open the program and you will see 4 options on the main screen. Here you will learn how to use each mode step by step.
WooTechy iPhixer offers 4 different modes for you to repair your device system based on your problems, which include System Repair, iDevices Reset, and iOS Upgrade/Downgrade, last but not least, enter/exit Recovery Mode for free.

Mode 1. Fix iOS/iPadOS/tvOS Issues
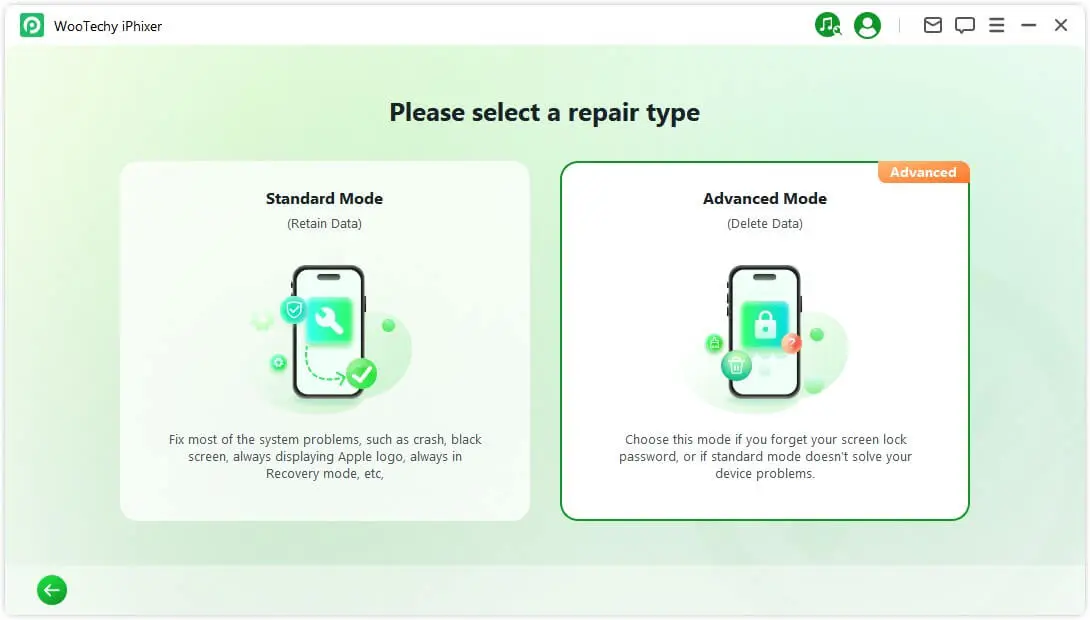
iPhixer offers two modes, Standard Mode and Advanced Mode, to repair your iOS/iPadOS/tvOS devices if they encounter problems such as iPhone/iPad/iPod touch/Apple TV stuck on Apple logo/Recovery Mode, black/white screen, boot loop, won't turn on, etc.
Option 1. Use Standard Mode
The Standard Mode can fix most common iOS/iPadOS/tvOS issues without data loss. To use this mode, please follow the specific steps below.
Step 1: Open the tool and connect your device
Launch iPhixer on your Windows or Mac computer and connect your device to the computer. Choose the Standard Mode and tap on the Next button to continue the process.
Note: You have to unlock your device before the next step, as the software will not recognize it if it is locked.

After clicking the Next button, you will be brought to the next procedure once your device is detected. In case your device is not recognized, you will be asked to put your device into Recovery or DFU Mode. Just follow the instructions shown on the screen.

Step 2: Download the firmware
Next, to repair your iOS device, you have to download the firmware by clicking the Download button. The software will automatically show the available and suitable firmware version of your device. You can also choose the version that you like.

Once downloaded the latest firmware package, you should be aware that this process may take some time for the package to be approximately 5GB.

In case you encounter difficulties while attempting to download the firmware package, you have the option to obtain it through your web browser by selecting "download via browser."
If you've already downloaded the firmware package onto your computer, you can easily import it by clicking "Select it."

Step 3: Fix iOS/iPadOS/tvOS issue
After obtaining the firmware, proceed by clicking on "Start Standard Repair"to commence the device repair procedure.

The program will initiate the device repair, and it is advisable not to disturb the cable or your device while this process is ongoing.

The repair process will be completed shortly, and your iPhone will restart automatically.

Should the procedure encounter any issues, you can choose to either retry or switch to Advanced Mode.
Option 2. Use Advanced Mode
If the Standard Mode fails to repair your device or you happen to forget your screen passcode, you could try the Advanced Mode. Please be aware that this mode will erase all your device data.
Step 1: Connect your device to a Computer
After clicking the Next button, you will be brought to the next procedure once your device is detected. In case your device is not recognized, you will be asked to put your device into Recovery or DFU Mode. Just follow the instructions shown on the screen.
To put your device into Recovery Mode:

To put your device into DFU Mode:

Step 2: Download the firmware
Next, to repair your iOS device, you have to download the firmware by clicking the Download button. The software will automatically show the available and suitable firmware version of your device. You can also choose the version that you like.

Once downloaded the latest firmware package, you should be aware that this process may take some time for the package to be approximately 5GB.

In case you encounter difficulties while attempting to download the firmware package, you have the option to obtain it through your web browser by selecting "download via browser."
If you've already downloaded the firmware package onto your computer, you can easily import it by clicking "Select it."

After obtaining the firmware, proceed by clicking on "Start Advance Repair" to commence the device repair procedure.

The program will initiate the device repair, and it is advisable not to disturb the cable or your device while this process is ongoing.

The repair process will be completed shortly, and your iPhone will restart automatically.

Mode 2. Downgrade & Upgrade iOS
If you're unable to upgrade your iOS system using the standard procedure, you have the option to use the iOS Upgrade feature to update your system without any data loss. On the other hand, if you simply want to go back to a previous iOS version, you can select iOS Downgrade.

iOS Upgrade
Step 1:Select "Upgrade iOS"
Choose this option to upgrade your iOS system while retaining your device's data.

Step 2: Connect your device to a computer
Connect your device to the computer using a lightning cable and follow the on-screen instructions.

Step 3:Download the firmware
The program will detect your device and display the available firmware package version for the upgrade. You can customize the download path for the firmware package file. Click "Download" to start downloading the firmware package.

iPhixer will then proceed to extract the downloaded firmware and use it to initiate the upgrade process.

Step 4:Start upgrading iOS
Your device is now fully prepared for the iOS upgrade. Click "Start Upgrade iOS" to begin the upgrade process.

Please wait for the program to complete its task. It's important to keep your device connected to the computer without using it during the entire process. Once done, you will see a "Done" message indicating that the upgrade process is completed.

Once done, you will see a "Done" message indicating that the upgrade process is completed.

iOS Downgrade
Step 1:Select "Downgrade iOS"
Choose to downgrade the iOS system, but please note that your device's data will not be preserved.

Step 2: Connect your device to a computer
Connect your device to the computer using a lightning cable and follow the on-screen instructions to put your device into Recovery Mode or DFU Mode.

Step 3:Download the firmware
The program will detect your device and display the available firmware package version for the downgrade. You can customize the download path for the firmware package file. Click "Download" to start downloading the firmware package.

iPhixer will then proceed to extract the downloaded firmware and use it to initiate the downgrade process.

Step 4:Start downgrading iOS
Now, the firmware can be used to downgrade your iOS system. Click "Start Downgrade iOS" to begin the downgrade process.

Please be patient while the process completes, and avoid using or moving your device during this time. Once finished, you will see a pop-up message indicating "Done," confirming the successful downgrade of your iOS system to the previous version.

Mode 3. Reset iDevices
To reset your iPhone/iPad/iPod touch, iPhixer offers two modes for you, Standard Reset and Hard Reset. After resetting your iDevice, you could regain access to it.

Option 1. Standard Reset
The Standard Reset is suitable for your iOS devices which are unlocked. You can do this with ease.
Step 1: Step 1. Select Standard Reset
Select the Standard Reset on the interface. Remember standard reset will erase all data and settings on your device.

Step 2:Connect device to computer
When choosing Standard Reset, connect your device to the computer. Input your iDevice's password and establish trust with the computer. Subsequently, click the Standard Reset button to start the standard reset procedure for your device.

Step 3:Reset Successfully
iPhixer will automatically start resetting your device. Please be patient during the process.
The reset of your device has been accomplished successfully. Click Done to finalize the process.

Option 2. Hard Reset
If you have forgotten the password of your device, then you could use the Hard Reset mode to factory reset your device. It will take several steps to complete the process and finally, your device will be updated to the latest version.
Step 1: Select Hard Reset
Select the Hard Reset on the interface.

Step 2: Connect device to computer
Connect your device to the computer once you chose the Hard Reset and follow the on-screen instructions to put your device into Recovery Mode/DFU Mode.

Step 3: Download device firmware
Click Download button to get the latest firmware version.

This process may take some time, so please wait patiently. Upon downloaded, it will automatically be extracted on your PC.

Step 4: Start Hard Reset
The extracted firmware enables you to execute a Hard Reset on your device. Initiate the reset process by clicking on"Start Hard Reset."

iPhixer will hard reset your device soon. When the process is successfully done, your device will be restarted.

Mode 4. One-click to Enter/Exit Recovery Mode
If your device's Home and other buttons are broken, you could use iPhixer to help you get your iPhone/iPad/iPod touch/Apple TV into or out of Recovery Mode through one click. The process just takes a few seconds.
Step 1:Connect your device to the computer
Ensure your iOS device is connected to your computer.
Note: For a successful iOS repair, it is strongly advised to use Apple's original Lightning USB cable when connecting your iOS device to the computer.
Step 2: Enter/Exit recovery mode
Option1. Enter recovery mode
After successfully connecting your device to the computer, as indicated in the illustration below, click the available Enter Recovery Mode button. That's it. Your device is successfully in Recovery Mode.

Shortly thereafter, you will receive a confirmation message indicating that you have successfully entered recovery mode.

Option2. Exit recovery mode
Upon connecting your device to the computer, as depicted below, the "Quit" button will become clickable. Proceed by clicking on it.

Shortly thereafter, you will receive a confirmation message indicating that you have successfully exited recovery mode.

Device Connected But Not Recognized?
If you are experiencing this issue while using the software, then follow the steps below to troubleshoot this problem.
Step 1:Unlock your device screen
Make sure your device is powered on and the screen is unlocked. Once unlocked, choose "Trust" on your device to enable proper functioning of the data cable.
Step 2:Inspect the USB port and reconnect the device
Check for potential poor contact in the USB port on your computer equipment. If issues persist, try reconnecting the device using a different USB port.
Step 3:Replace the USB cable
If your current data cable is damaged or only suitable for charging, consider replacing it with a new one. For optimal compatibility and performance, we recommend using Apple's original data cable.