Voicemail, a feature as old as the hills, is yet still as relevant as ever. In today's fast-paced world, we can't always answer our calls, but we can ensure the caller's message reaches us. Setting up voicemail on your Android device is a breeze.
In this guide, we'll walk you through how to set up voicemail on Android step by step. Whether it's your first time or you need a refresher, we've got you covered.
- Part 1. Why You Should Set Up Voicemail
- Part 2. How to Set up Voicemail on Android via Phone App
- Part 3. How to Set up Voicemail on Android via Google Voice
- Part 4. How to Set up Visual Voicemail on Android
- Part 5. How to Delete Voicemail on Android
- Part 6. Use iSeeker to Get Deleted Voicemail Back on Android [No Backup Needed]
- Part 7. FAQs about Setting up Voicemail on Android
Part 1: Why You Should Set Up Voicemail?
Voicemail is a telecommunications feature that allows callers to leave recorded messages for individuals when they are unable to answer the phone. Voicemail systems can be personalized with custom greetings, password protection, and other features to enhance their functionality and security.
Setting up voicemail on Android phone may seem like a simple task, but understanding why you should do it is equally important. Here are some compelling reasons why you should set up voicemail:
Never Miss Important Calls
Stay Connected even when you can't answer the phone
Prioritize Your Responses by letting you review messages and determine the importance of each call
Serve as a crucial tool in emergencies
Have control over when and how you respond to messages
Part 2: How to Set up Voicemail on Android via Phone App
Many people ask "how do I set up my voicemail on my Android?" Well, for starters, using the native phone app is a straightforward process. Follow these steps to get your voicemail up and running:
Step 1. Initial Voicemail Setup
- Launch the Phone app on your Android device.
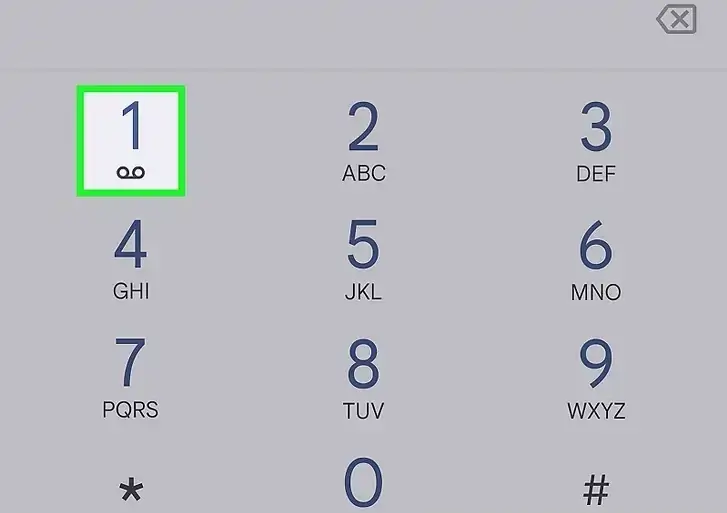
- Long press 1 key on keypad. If it's your first time setting up voicemail, a message might appear, saying, "To set up voicemail, go to Menu > Settings." Simply tap "OK" if this message appears.
Step 2. Accessing Voicemail Settings
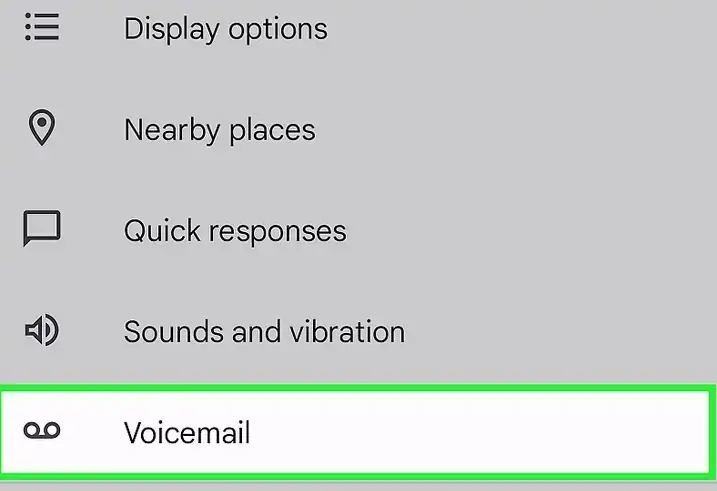
- In the Phone app, tap the three vertical dots located in the top-right corner of the screen, then select "Settings."
- Scroll down the settings menu until you find the "Voicemail" option, and tap on it.
Step 3. Advanced Voicemail Settings
- Within the Voicemail settings, seek out and tap on "Advanced Settings."
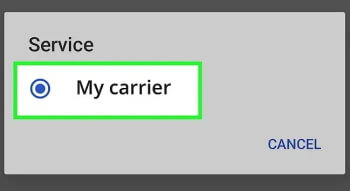
- Choose the "Service" option from the menu that appears.
- Find "My carrier" in the advanced settings, and select it.
Step 4. Setting Up Voicemail Number
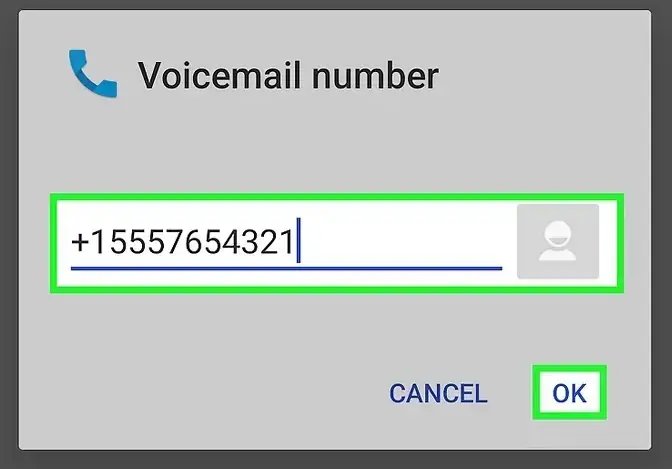
- In this section, you'll see a field labeled "Voicemail number" with the default value "Not set." Simply tap this field.
- Type in your mobile phone number and tap "OK." This action establishes your voicemail number.
Step 5. Accessing Voicemail
- To return to the Phone app's main screen, either repeatedly tap the back button until the keypad is visible or tap the Phone icon on your device's home screen.
- Initiate access to your voicemail by pressing and holding the number 1 key on your keypad. This will initiate a call to your voicemail service.

Step 6. Completing Voicemail Setup
- Carefully listen to and follow the instructions provided by your voicemail service to finalize the setup.
- Once voicemail is set up, you can easily check your voicemail by either long pressing the number 1 key on your keypad or tapping the voicemail notification that appears on your screen.
Part 3: How to Set up Voicemail on Android via Google Voice
Setting up voicemail on Android via Google Voice is a convenient option that allows you to manage your voicemail messages using Google's services. Follow these steps to set up voicemail on your Android device using Google Voice:
If you haven't already, download and install the Google Voice app from the Google Play Store.
Open the Google Voice app and sign in with your Google account credentials.
Select the gear Settings icon at the upper right corner and choose "Voicemail & Text" where you can customize your voicemail greeting by selecting the "Voicemail greeting" option.
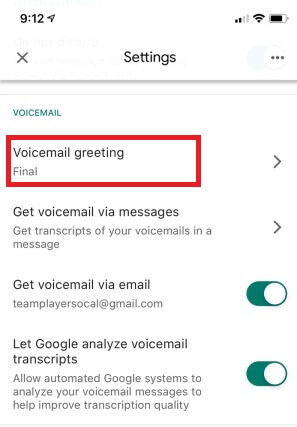
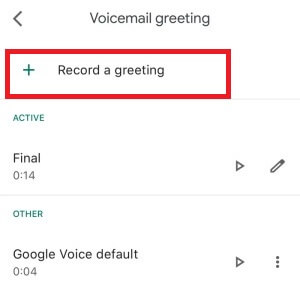
Go to the "New greeting" page and tap the green microphone icon. Begin recording your voicemail greeting. When finished, tap "Stop."
Tap "Save" and assign it a name. Confirm by tapping "Save" again. If you wish to redo it, tap "Redo" to start over.
Part 4: How to Set up Visual Voicemail on Android?
Visual Voicemail is a feature available on many Android devices that enhances the traditional voicemail experience. It provides a user-friendly, visual interface for managing voicemail messages, offering several advantages:
Strengths of Visual Voicemail:
Visual Voicemail allows you to see a list of your voicemail messages, so you can choose which ones to listen to first, saving time.
Messages are neatly displayed with timestamps and caller information, making it easier to manage and prioritize them.
You can play, pause, or delete messages with ease, and even read transcriptions of voicemails if available.
It gives you the ability to rewind, fast-forward, and repeat messages as needed.
Setting Up Visual Voicemail on Android:
Ensure your Android device and mobile carrier support Visual Voicemail.
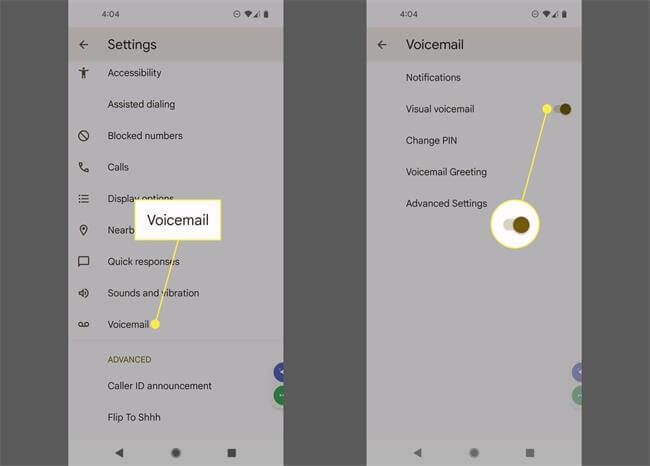
Open the Phone app, tap the menu or settings icon, and locate "Voicemail."
Turn on the Visual Voicemail option in the settings.
You may be prompted to review and accept your carrier's Visual Voicemail terms.
Return to the Phone app's main screen and find the "Voicemail" or "Visual Voicemail" tab. Tap it to access your voicemail inbox.
Note
This feature is now only available to users of Android 6.0 or later. And in order to use this feature, make sure that your carrier supports it.Part 5: How to Delete Voicemail on Android?
To delete voicemail on an Android device, you can follow these general steps:
Option 1: Using the Phone App (may vary by device):
Open your Phone app.
Navigate to the "Voicemail" section.
Find the voicemail you want to delete.
Tap and hold the voicemail message.
A menu should appear with the option to delete. Select "Delete."
Option 2: Using Visual Voicemail (may vary by carrier):
Open your Visual Voicemail app.
Locate the voicemail message you want to delete.
Select the voicemail that you want to delete and tap on the three-dot settings.
Look for the Edit option, then press and hold on to the voicemail until the delete option appears below.
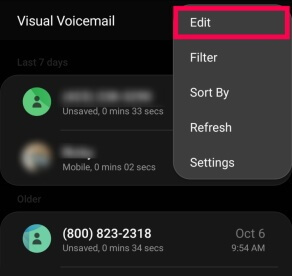
Tap on Delete and confirm the action.
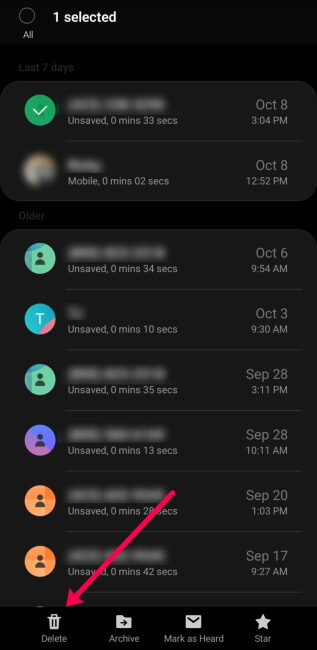
Option 3: Using Google Voice (if enabled):
Open the Google Voice app.
Navigate to your voicemail messages.
Find the voicemail you wish to delete.
Tap and hold the voicemail message.
Select "Delete" from the menu that appears.
Part 6: Use iSeeker to Get Deleted Voicemail Back on Android [No Backup Needed]
What if you accidentally delete your voicemail which happens to be very important? What to do next? Don’t worry, if such a thing really happens, then you might try WooTechy iSeeker for Android, an Android data recovery tool, to get your deleted voicemail back.
iSeeker for Android is an outstanding recovery tool for Android in the market. With it, you can retrieve lost or deleted data on your Android phone with or without backup. What’s best is that you don’t even need to be a tech expert. With its user-friendly interface, you can easily recover your lost voicemail back in minutes.
Key Features of iSeeker Android

75.000.000+
Downloads
- Retrieve deleted/lost data from an Android, even if it is broken, will not turn on, or is hard to access.
- Highest recovery success rate in the industry.
- Support 11+ types of Android data recovery including text messages, contacts, photos, audios, videos, and much more.
- Compatible with 6000+ Android phones like Samsung, Huawei, Xiaomi, LG, etc and a full range of Android versions (including the latest AndroidOS 13)
- Offer free preview for every user.
-
Free Download
Secure Download
Free Download
Secure Download
How to Use iSeeker for Android to recover deleted voicemail?
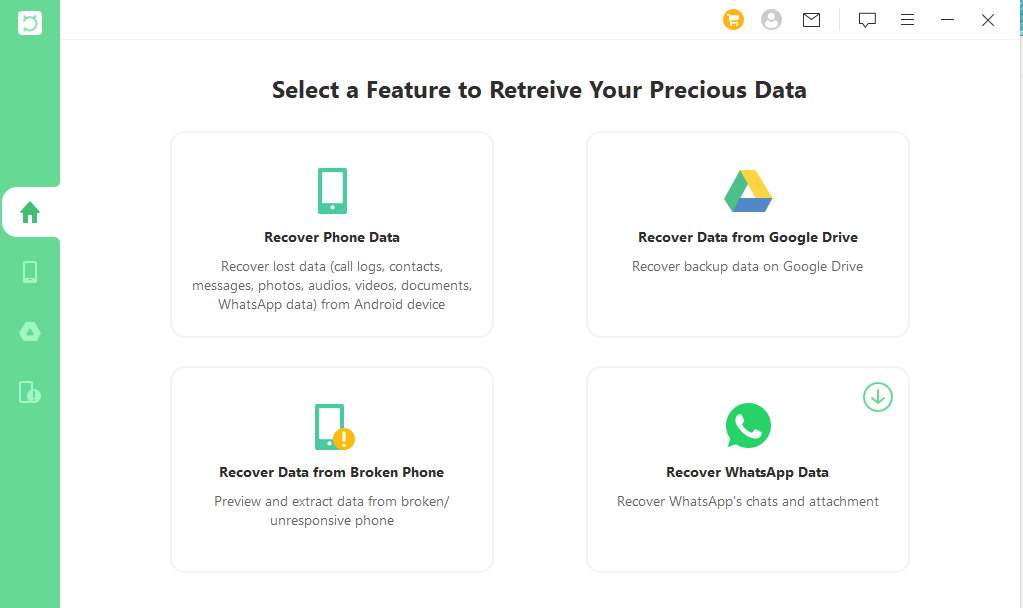
Step 1. Download, install, and launch iSeeker on your computer. Choose "Recover Phone Data" from the main menu and connect your device via USB.
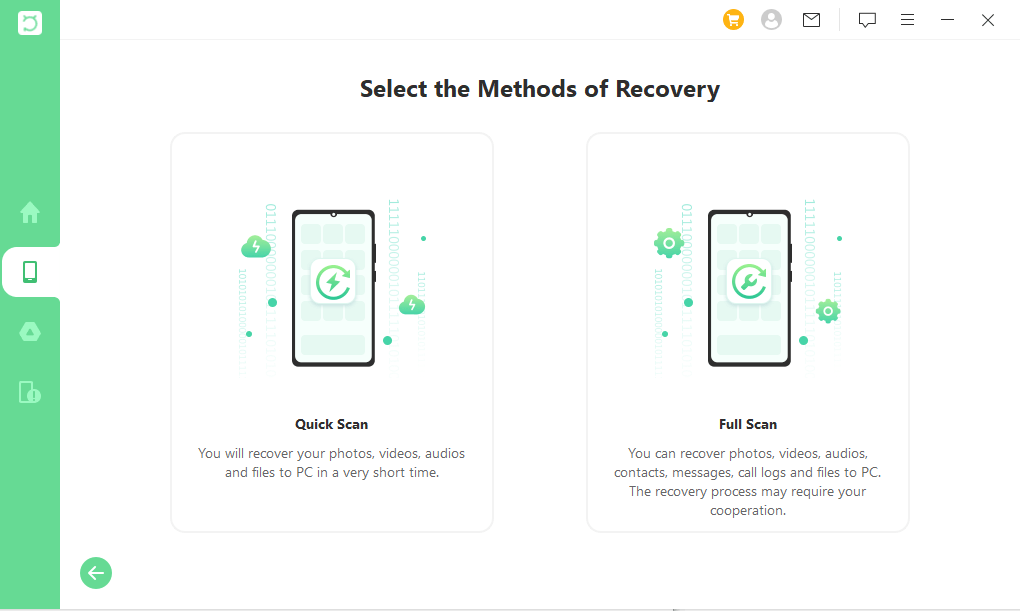
Step 2. You will be prompted to select a recovery method: Quick Scan or Full Scan. Choose either one and wait for iSeeker to gather device info.
Step 3. iSeeker will display recoverable files and voicemails. Select the specific voicemails you wish to recover and click the "Recover" button to initiate the restoration process.
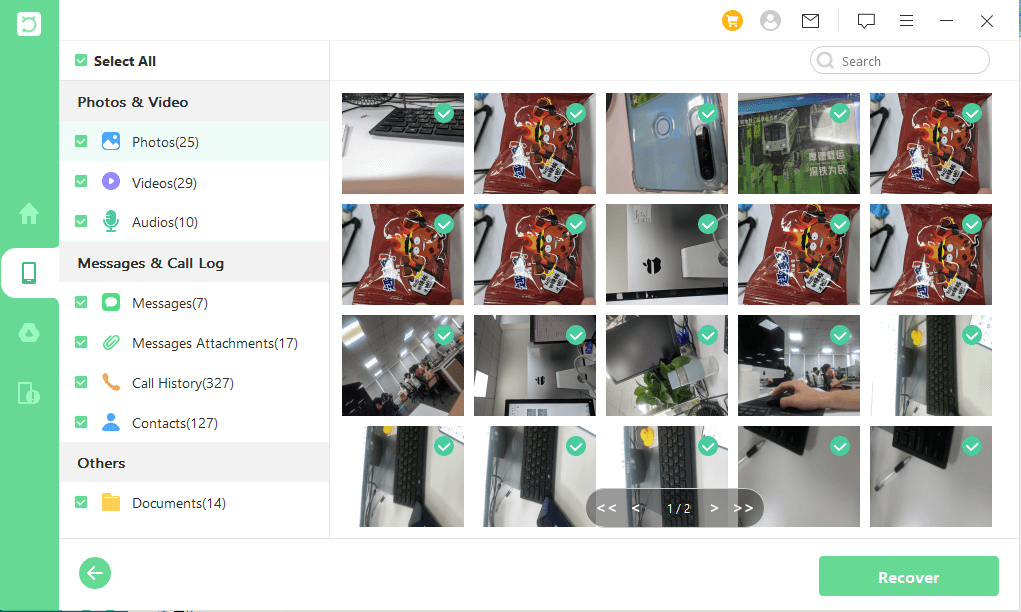
Once recovered, you can decide on the file format for saving the recovered voicemails.
FAQs about Setting up Voicemail on Android
Q1. Why do I not have voicemail on my Android Phone?
If you don't have voicemail on your Android phone, it could be due to several reasons:
Your carrier may not offer voicemail services.
Voicemail might not be set up or activated on your phone.
There could be network or software issues preventing voicemail from working. Contact your carrier or check your phone's settings.
Q2. Is voicemail number the same as phone number?
No, the voicemail number is not the same as your phone number. It's a separate number provided by your carrier that your phone uses to access and retrieve voicemail messages.
Q3. Why is my voicemail not working?
Voicemail issues can arise due to various reasons:
Network problems: Poor signal or connectivity issues can affect voicemail.
Configuration: Incorrect voicemail settings or setup can cause problems.
Account issues: If your account is not in good standing with your carrier, voicemail might not work.
Software glitches: Sometimes, software updates or bugs can affect voicemail functionality. If so, then you can use iPhixer - an iOS system recovery tool to fix the problem quickly.
Free Download
Secure Download
Q4. How to Save Voicemail on Android?
To save voicemails on Android, you can follow these general steps:
Open your phone's voicemail app.
Tap on the voicemail message you want to save. Depending on your phone and voicemail app, you might need to tap and hold the message.
Look for an option to save the voicemail. This can vary by phone and app, but it might be labeled as “Save, Export, or Archive”.
Select where you want to save the voicemail.
Q5. Is Samsung voicemail free?
Voicemail services are often included as part of your mobile plan, so there's usually no additional cost to use voicemail on a Samsung phone. However, it's best to check with your carrier to confirm any potential fees associated with voicemail.
Conclusion
Voicemail on Android is indispensable for receiving important messages when unavailable, enhancing communication in personal and professional life. I am sure that after reading this article, you would find it easy to set up voicemail on Android. If you accidentally delete an important voicemail, then you can use iSeeker for Android to get it back.
Free Download
Secure Download
Free Download
Secure Download


