


Note: The device may be unlocked only with the user's authorization.
The message “iPod is disabled, connect to iTunes” always appear when you input wrong passcode for 10 times and it will greatly influence the comfort of your day-to-day life as you will not be able to use your device. However, you have no reason to worry since there are some possible solutions.
In this article, you will learn the 4 most effective ways to fix your disabled iPod. Keep reading.
What to Do if iPod Is Disabled and Shows Connect to iTunes
1. Restore the Disabled iPod with Recovery Mode
If you see the message “iPod is disabled, connect to iTunes”, then the first thing you can try is to put your iPod into recovery mode and then restore it. By doing this, you will delete all of the data stored on your device, but it won’t be a big problem if you have a backup before. To use this method, you have to complete the following steps:
The steps for a 7th generation iPod: Make sure that your iPod is connected to your computer. Press and hold the Top button and the Volume Down button. Keep pressing them until the recovery mode screen becomes visible.
The steps for a 6th generation or earlier iPod: In the beginning, your iPod should be connected to your computer. Press and hold the Home button and Top Button together for about 10 seconds. Release these buttons when you can see the recovery mode screen.

When you complete the above process, your iPod will be in recovery mode and you will need to do the following:
Update and launch iTunes or Finder on your computer. The application will detect your device and you will see a popup window.
Click the Restore button and follow the prompt to confirm your action. iTunes will take a few minutes to complete the process. When it is over, you can set up your device as a new one.

2. Restore the Disabled iPod with DFU Mode
Similar to the previous method, you can try putting your iPod into DFU mode. This process can effectively fix your disabled iPod showing connect to iTunes, even though many users find it challenging to complete. In more detail, if you fail during the steps, your device will be put in recovery mode instead, and you will need to start the process from the very beginning. With this method, you will remove all of your device’s data, while you can restore the backup afterwards.
To achieve this, you must follow these steps:
Step 1 Launch iTunes or Finder on your computer. Then, connect your iPod to the computer using a USB cable.
Step 2 Press and hold the Top and Home buttons simultaneously until the screen becomes black.
Step 3 After that, you need to release the Top button and keep holding the Home button for 10-20 seconds. Then, iTunes will detect your device in DFU mode.
Note
The message will be “iTunes has detected an iPod in recovery mode, you must restore this device before it can be used with iTunes.”

Step 4 Let go of the Home button. If you are not quick enough, your device will be put into recovery mode.
Step 5 If you do it right, you must click the OK button on the pop-up window and then choose Restore iPod on the screen. Wait for a few minutes until the process is completed.
3. Erase Your Disabled iPod via iCloud
Similar to the previous method, you can try putting your iPod into DFU mode. This process can effectively fix your disabled iPod showing connect to iTunes, even though many users find it challenging to complete. In more detail, if you fail during the steps, your device will be put in recovery mode instead, and you will need to start the process from the very beginning. With this method, you will remove all of your device’s data, while you can restore the backup afterwards.
To erase your disabled iPod via iCloud, you have to follow these steps:
Step 1 Open the web browser you have installed on your computer. Then, visit icloud.com.
Step 2 Log in to your iCloud/Apple ID account by typing your credentials.
Step 3 Then, click the Find My > All Devices.
Step 4 Locate your iPod on the list of the connected devices. Under your iPod’s icon, you will see the Erase iPod button that you need to click. Once you click it, your device will be erased. After that, you can set it up as usual.

4. Unlock Your Disabled iPod Using WooTechy iDelock
All of the above methods are effective in fixing your disabled iPod. Nevertheless, one of the easiest ways to do it is to use WooTechy iDelock. This specialized computer application is extremely user-friendly so that you can fix your device even when you don’t have any technical knowledge. In addition to this, iDelock brings solutions to many other lock issues, and for this reason, it will become an essential tool in your everyday life.
Download Now
Secure Download
To start using iDelock to fix your disabled iPod, you will need to take the following steps:
Step 1 Download the application’s installer. Once the installation process is over, launch it on your computer. From the home screen, click the Unlock Screen Passcode option and the Start button.

Then, connect your iPod to your computer with a USB cable and click Next so that iDelock can detect your device.


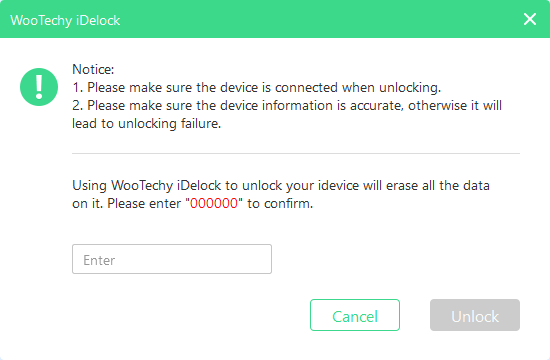
Step 3 After the extraction is completed, click the Start button and keep your iPod connected to your computer at all times. You will need to confirm your action by typing 000000.
Your device will be automatically put into recovery mode. Wait for a few minutes until iDelock removes your screen passcode.
Conclusion
If you enter incorrect passcode for too many times and see the message “iPod is disabled, connect to iTunes”, just follow the methods in this article to easily fix it. From all of them, WooTechy iDelock is the most effective way with the highest success rate to unlock your disabled iPod. Just download and give it a try!
Download Now
Secure Download