


Voice memo of iPhone is a great tool. You can use it to playback a record of lectures, an instrument, or a special memory. It is also a great way to quickly record important information and ideas or capture a random thought for transcription later. Recording on the iPhone gives you the flexibility of having them all the time.
In some instances, however, you may need to save the recorded file on your PC as well. Most iPhone users might suggest using iTunes because it seems to be the most straightforward way. What if you don't want to use iTunes for your convenience? Learn how to transfer voice memos from iPhone to PC without iTunes with detailed instructions in this article!

- Part 1. Transfer Voice Memos from iPhone to Computer with iSeeker
- Part 2. Transfer Voice Memos from iPhone to PC with Airdrop (Mac Only)
- Part 3. Transfer Voice Memos from iPhone to PC by Share (Email/Dropbox)
- Part 4. Transfer Voice Memos from iPhone to PC with iCloud Drive
Part 1. Transfer Voice Memos from iPhone to Computer with iSeeker
One of the most effective ways to transfer voice memosfrom iPhone to PC without iTunes is using the WooTechy iSeeker. This is a powerful iOS data extractor tool, which can easily export data on iPhone, iPad, iPod to computer.
This program allows you to scan voice memo files in your iPhone, preview and save them on your Mac or PC in a few minutes. In only three simple steps, you can export your voice memo to your computer. Other than transferring files from iPhone to computer, it can also extract files such as photos from your iCloud and iTunes backup and recover lost or deleted data directly from iPhone even if you haven't made any backup.
Top Features of WooTechy iSeeker
100.000+
Downloads
- In addition to extracting voice memos directly from iPhone, it can also extract voice memos only from iCloud or iTunes backup.
- It supports 18+ types of data, including photos, videos, WhatsApp data and so on..
- It works well on all iOS devices and supports iOS 16.
- It allows you to preview and select certain voice memos to extract.
- It's provides a free trial, with which you can scan and preview the data on your PC for free.
Download Now
Secure Download
Follow these steps to use iSeeker to move voice memos from iPhone to computer without iTunes:
Step 1. Open the iSeeker on your Mac or PC and choose the Recover from iOS Device option. Connect your iPhone to the computer. Once the device has been detected, click Next to continue.

Step 2. In the next window, select Voice Memo in the data type list. Then click the Scan button to allow the program to perform a thorough scan on the device to find data.

Step 3. Once the scan is complete, all the voice memos in the device will be displayed on the screen. Select the specific files you want, click on the Recover button, and choose a safe location within the PC to save the files.

Part 2. Transfer Voice Memos from iPhone to PC with Airdrop (Mac Only)
If you are wondering how to transfer voice memos from iPhone to PC without iTunes, Airdrop offers a worthy consideration.
Airdrop is a close-range wireless transferring service that allows Apple users to transfer files amongst Mac and iOS devices. It lets you quickly share and receive media such as photos and videos from other nearby Apple devices. To use Airdrop, you need to turn on sharing permission in Finder on Macs or set on iPads and iPhones. The Apple devices must be within the range of 30 feet for the Airdrop to work. And it has no limit on the size of the file.
To use Airdrop to move voice memos from iPhone to your computer, follow these steps:
Launch the Voice Memos app on your iPhone.
Select the voice memo you want to transfer from the list.
Tap on the three-dot-con button for more options, and choose the Share button.
Choose to send the memo via Airdrop.

The only drawback of using Airdrops is that you can only transfer one item at a time, which can be limiting your ability to copy many files. If you want to copy multiple files to your PC at a time, using iSeeker will give you better results.
Part 3. Transfer Voice Memos from iPhone to PC Without iTunes by Share (Email/Dropbox)
As you can only use Airdrop to transfer voice memos to Mac, if you are using a Windows PC, you can transfer voice memos from iPhone to computer by Email or Dropbox.
1. Move Voice Memos from iPhone to PC with Email
Transferring voice memos from iPhone to computer using email is one of the easiest methods to use. You just need to send the voice memos in the email to your PC. However, the method is still limited to transferring a few files at a time.
To transfer voice memos from your iPhone to PC using email:
Launch the Voice Memos app on your iPhone. Select the voice memo you want to transfer.
Tap on the three-dot icon, and select Share.
Choose to send the memo via Email and enter your email address.

2. Move Voice Memos from iPhone to PC with Dropbox
Clouds such as Dropbox, OneDrive, and Google Drive provide another way to transfer voice memos from iPhone to PC without iTunes. The clouds offer the user both transfer and backup services. However, they differ from each other in terms of free space and features. And we just tell you how to transfer with Dropbox in detail here, you can also try other options by yourself. They are all feasible ways to save iPhone voice memos to PC.
To transfer voice memos from iPhone to PC using Dropbox:
Launch the Voice Memos app on your iPhone. Select the voice memo you want to transfer.
Tap on the three-dot icon. Choose Save to Dropbox from the window that pops up.
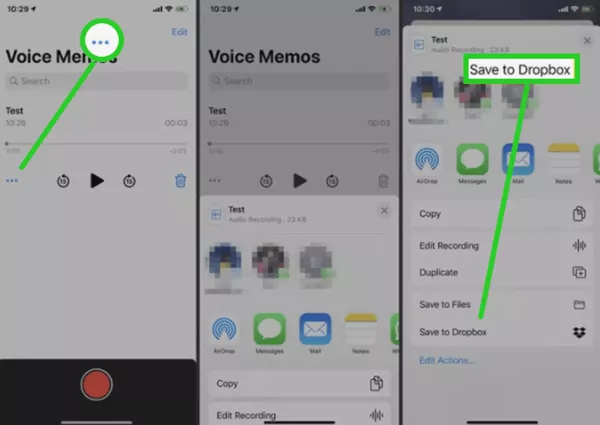
Once saved, open the Dropbox software on your computer and play the voice memo.
Part 4. Transfer Voice Memos from iPhone to PC with iCloud Drive
You can also transfer voice memos from your iPhone to PC easily with iCloud Drive. iCloud Drive allows you to share files across different iOS devices using WiFi. You can securely access all your documents from your iPhone, iPod Touch, iPad, Mac, and Windows PC using iCloud Drive. Therefore, uploading your voice memos to iCloud Drives gives you access to the file on your computer.
To transfer voice memos from iPhone to PC with iCloud Drive:
Open the Voice Memos app on your iPhone. Tap All Recordings.
Tap the recording you want to transfer to your PC. Tap the three-dot in the upper-right corner.
In the Share sheet, select Save to Files. Tap iCloud Drive. Tap Documents or choose a different folder where you want to save your voice memos. Tap Save.
Using your Apple ID and password, log into iCloud.com with your PC and download the voice memos you saved in the folder.

Conclusion
Transferring voice memos from iPhone to PC without iTunes does not always have to be hard. There are several approaches you can use, including email, Dropbox, or Airdrop. However, these methods are limited to one file at a time, which can be time-consuming and tiring.
The most effective method to transfer voice memos from iPhone to PC without iTunes is to use the WooTechy iSeeker. The software is easy to use and will transfer the files in three simple steps. Click the free download link and get iSeeker now.
Download Now
Secure Download