Picture this: So, you've picked up your trusty iPhone, ready to capture that perfect moment on video, only to find yourself scratching your head in confusion. Where did the video option go?
Don't worry; you're not alone. Many iPhone users have encountered this perplexing scenario, searching for the elusive video option amidst the array of features. But fear not, as we delve into the reasons behind this “No Video Option on iPhone” error and explore actionable solutions to bring back that cherished video option on your iPhone.
- Part 1. Why Is Video Not An Option on iPhone?
- Part 2. How to Fix “No Video Option on iPhone” Error on iPhone?
Part 1. Why Is Video Not An Option on iPhone?
First things first, let's ensure we're looking in the right place. Typically, the video option resides prominently within the Camera app, nestled among the various shooting modes. It's that familiar icon, the one you've tapped countless times before to record those memorable snippets of life. But sometimes, it might decide to play hide-and-seek.
The absence of the video option on an iPhone could be due to several reasons:
Settings Configuration: Check if the video option is disabled in the Control Center or under restrictions in settings.
In-call Status: During an active call, the video option might be unavailable to ensure call stability. End the call and attempt video recording again.
iOS Compatibility: Some apps or features might not be compatible with certain iOS versions, causing the video option to not appear.
App Glitches: Certain apps might have issues that affect the functionality of the video option. Troubleshoot by checking specific app settings or reinstalling problematic apps.
Part 2. How to Fix “No Video Option on iPhone” Error on iPhone?
If you can't find the video option on iPhone, don’t worry. We can work this out. Let's roll up our sleeves and tackle this problem head-on! Here are some steps you can take to bring that elusive video option back to life.
1Check Camera Preserve Settings
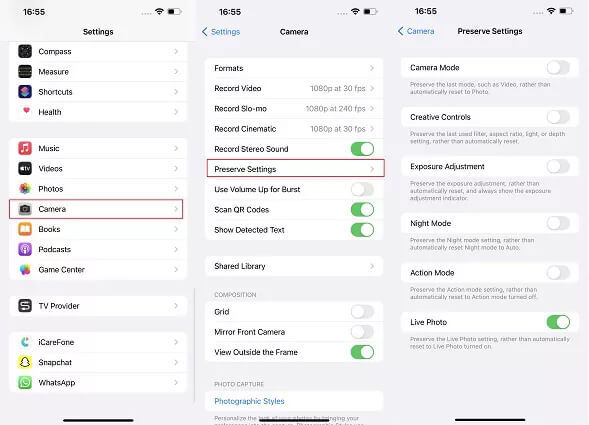
The Camera Preserve Settings feature on the iPhone ensures that your preferred camera mode, such as Video or Pano, is retained even after closing the Camera app. Enabling this feature saves your last-used camera settings, preventing the need to reselect your preferred mode every time you open the Camera app. However, these settings, if misconfigured, might lead to the absence of the video option on the iPhone's camera. To verify Camera Preserve Settings, follow these steps.
Open "Settings" on your iPhone.
Scroll down and select "Camera."
Tap on "Preserve Settings."
Toggle on the desired settings you want to preserve, such as Camera Mode, Filter, or Live Photo.
Related Read: iPhone 13/14 Camera Not Working After iOS 17 Update?
2Update to iOS 17
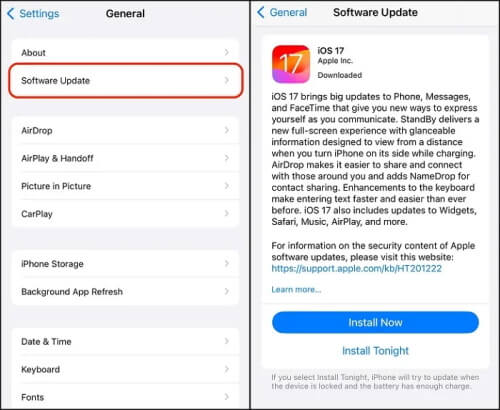
Updating iOS is crucial for your iPhone's performance, security, and access to the latest features. If you haven’t updated to the latest iOS 17 version, you might be missing some changes on the video feature cause your iPhone video option disappeared. So try to update to iOS 17 and see if the video option comes back. Here are the steps:
Open Settings > General > Software Update > Download and Install.
Enter your passcode if prompted, and follow on-screen instructions to complete the update.
3Restart iPhone
Restarting your iPhone isn't merely turning it off and on again; it's a reset that clears temporary data and resets various software components. This process often resolves minor software hiccups. When the video option disappears, you can try this method and see if it works.
Press and hold the Side button along with either Volume Up or Volume Down buttons simultaneously until the slider appears.
Drag the slider to power off your iPhone.
After your iPhone turns off, press and hold the Side button again until the Apple logo appears.
4Disable Screen Time Restrictions
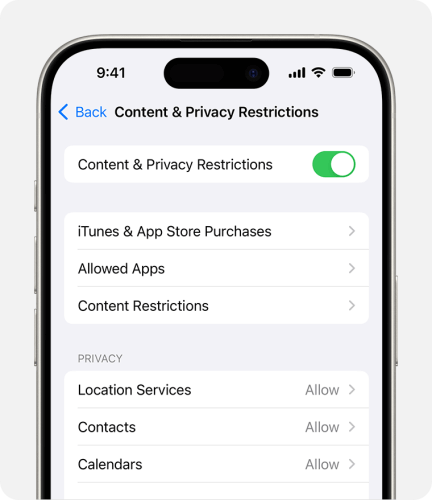
Content & Privacy Restrictions might have been activated unknowingly, limiting certain functionalities, including the video recording option. Moreover, if these restrictions were set up for parental controls or to limit access to certain features, they might be blocking the video recording capability. By disabling screen time restrictions, you remove any limitations that might have prevented the video option from appearing. Here is how to disable content & privacy restrictions:
Locate the Settings app on the home screen.
Scroll down and tap on "Screen Time" in the Settings menu.
If prompted, enter your Screen Time passcode. Within Screen Time settings, select "Content & Privacy Restrictions."
Toggle off the switch next to "Content & Privacy Restrictions." You might need to enter your Screen Time passcode again to confirm this action.
Exit Settings and open the Camera app to check if the video option is now available.
5Check Call Audio Routing
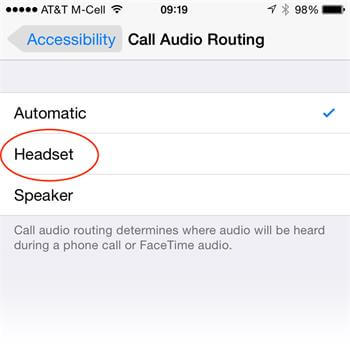
The Accessibility settings, specifically the "Call Audio Routing" option under "Touch," might inadvertently affect video recording functionality on your iPhone. This feature primarily deals with how audio is routed during calls, but it can occasionally impact other audio-related functionalities, including video recording. Checking and adjusting this setting can help rule out any accidental configurations affecting your ability to record videos. how to navigate to the "Call Audio Routing" option:
Open Settings and scroll down and tap on "Accessibility."
Within Accessibility settings, select "Touch."
Scroll down to find and tap on "Call Audio Routing."
Depending on your iPhone model and iOS version, you might see options like "Automatic," "Speaker," "Bluetooth Headset," or similar choices. Tap on your preferred audio routing option.
6Use QuickTake Feature to Record Video
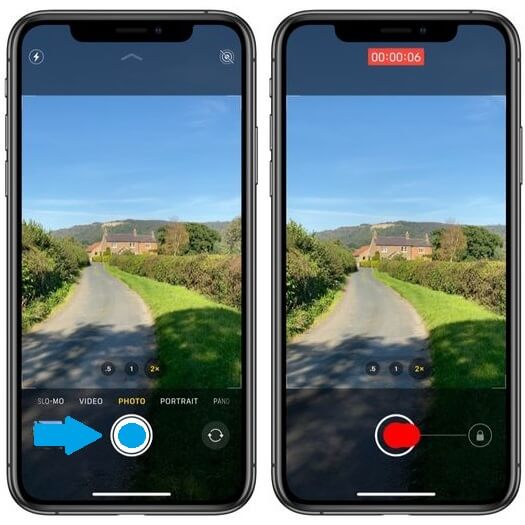
If you are in a hurry, instead of using video mode to record a video, you can use the QuickTake feature within the photo mode to do it. Using the QuickTake feature on your iPhone to record videos is a swift and convenient way to capture spontaneous moments without switching modes in the Camera app. Here's a guide on how to utilize QuickTake for video recording:
Access the Camera app on your iPhone from the home screen.
Ensure you're in photo mode within the Camera app. You'll see the viewfinder as you would for taking photos.
Instead of tapping the shutter button to take a photo, press and hold the shutter button. You'll notice the button changes to a recording icon.
Continue holding the shutter button to start recording your video.
To stop recording, release the shutter button. The video capture will cease automatically.
7Use an iPhone System Repair Tool
If all else fails and still video option on iPhone is gone, then you should consider using a professional system recovery tool to fix the problem and bring back the video option. One such tool is WooTechy iPhixer. It is a reliable iOS repair tool that can resolve over 150 iOS software bugs and glitches including no video option on iPhone.
Key Features of WooTechy iPhixer: Fix iPhone Has No Video Option[iOS 17 Supported]

75.000.000+
Downloads
- Using iPhixer iOS System Recovery software requires minimal effort and ensures no data loss.
- Its intuitive interface enables effortless navigation, allowing you to independently rectify issues with your iPhone, iPad, or iPod touch at home by following straightforward guidance.
- It seamlessly functions across all iOS versions, including the most recent iOS 17, iPadOS 17.
- It serves as an excellent iTunes alternative for restoring your iPhone without risking data loss or encountering unfamiliar iTunes errors.
- It provides a one-click function for entering or exiting recovery mode at no cost.
Free Download
Secure Download
How to Use iPhixer to Fix “No Video Option on iPhone” Error?
Step 1: Begin by installing iPhixer on your computer and launching the program. Opt for the Standard Mode available on the main interface.

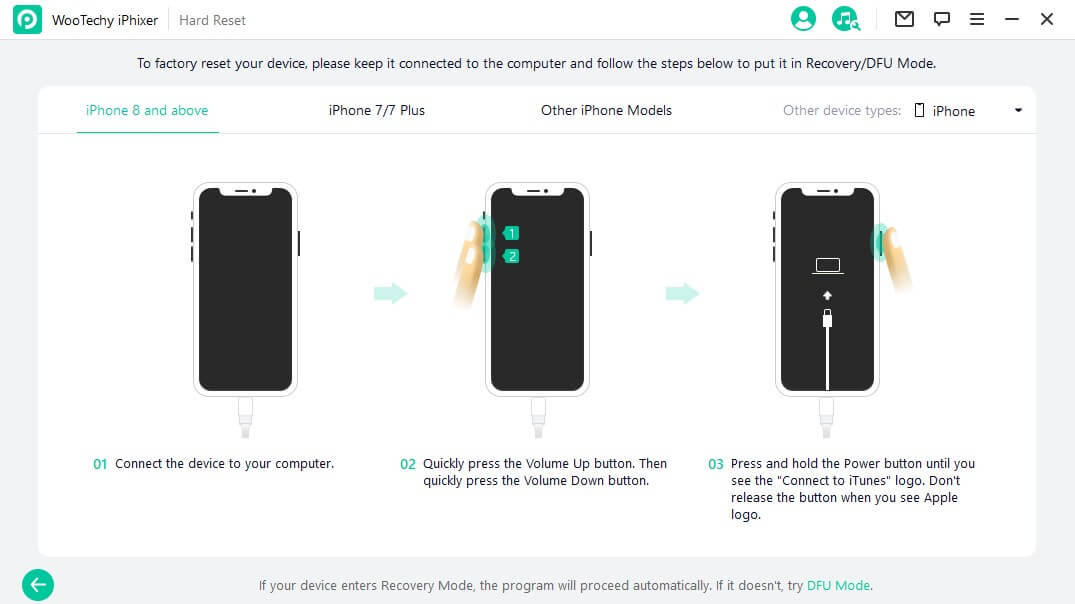
Step 2: Connect your iPhone to the computer using a USB cable and proceed by selecting the Next button. If your iPhone isn't recognized, follow the on-screen prompts to place it into Recovery mode or DFU mode.
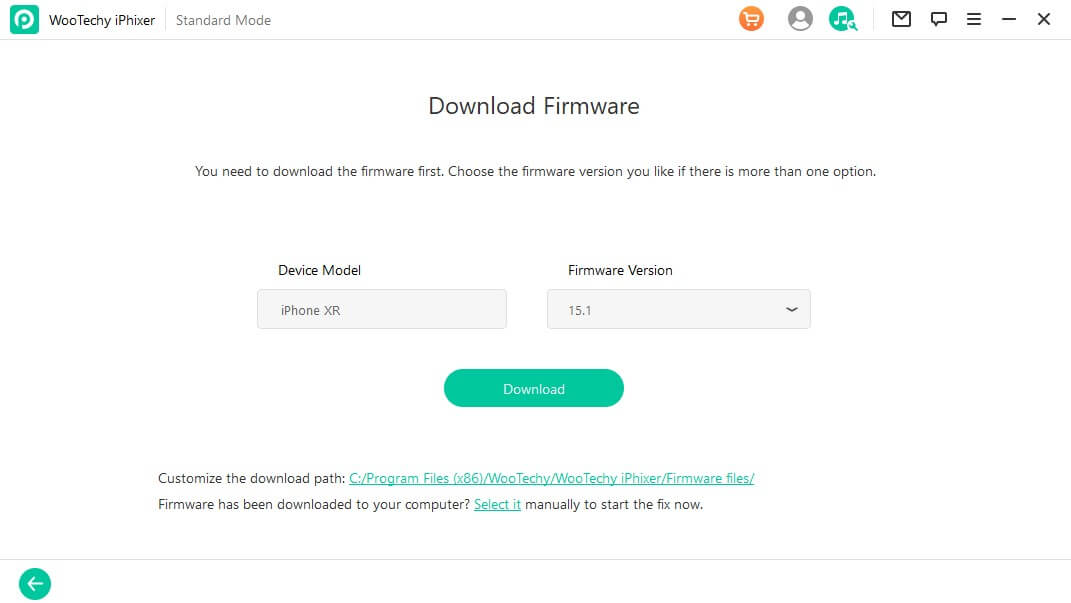
Step 3: Initiate the process by clicking on the Download button to acquire the firmware provided by the software. Rest assured, the firmware provided is completely secure and official.
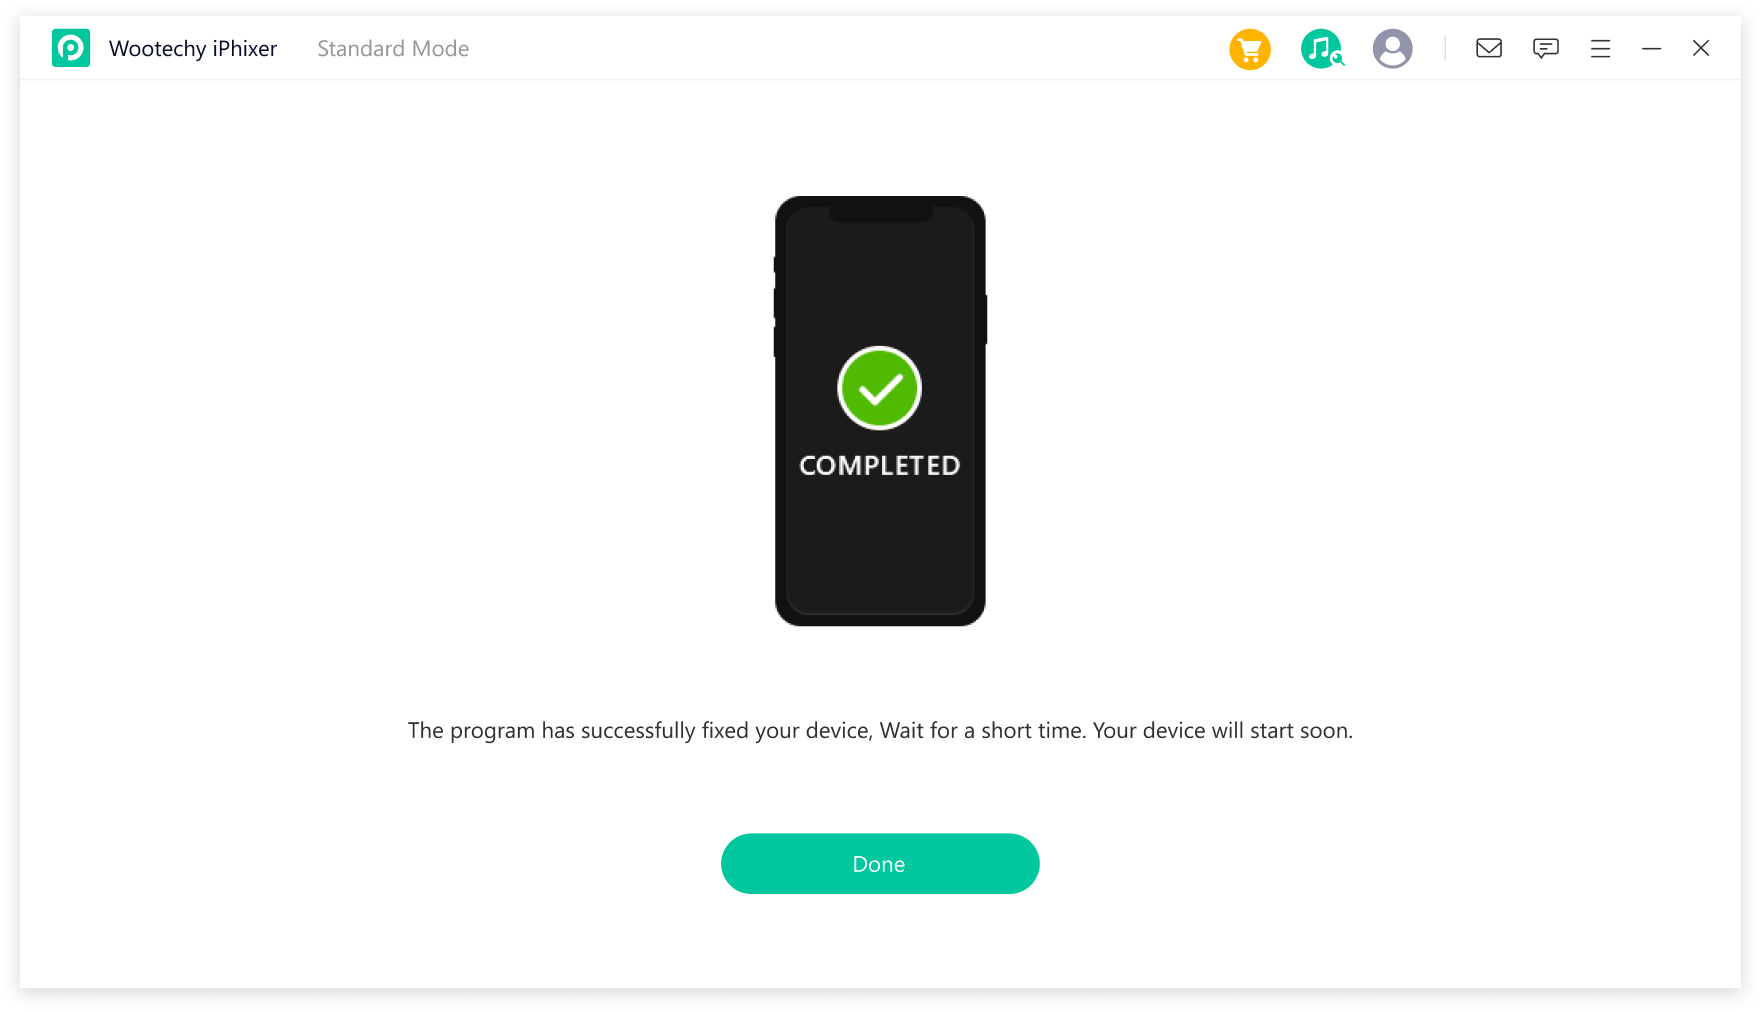
Step 4: Execute the repair process by clicking on the Start button. iPhixer will then commence resolving your iPhone's video option disappearing issue during the update. Upon completion, your iPhone will automatically restart.
Conclusion
Discovering the absent video option on your iPhone can be perplexing, but solutions abound. Above we have discussed various methods to regain video access on iPhone and each is proven to be working. Among them, using WooTechy iPhixer, a reliable iOS repair tool, for comprehensive solutions seems to be the most recommended choice. Try it for yourself and you won’t be disappointed.
Free Download
Secure Download


