Many Apple users have wanted to downgrade iOS for one reason or another, either because there are too many bugs in the latest iOS version, or it could simply be that they don't like the feature changes. However, since Apple periodically closes the portal for downgrading iOS, you may find it difficult to downgrade iOS via iTunes, which is probably why you are here.
So, how to install older version of iOS without iTunes? How to restore iPhone without iTunes? Take easy! This ultimate guide will show you 3 simple ways to downgrade iOS without iTunes along with easy-to-follow tutorials! Read on!
- Part 1. How To Downgrade iOS Without iTunes?
- Way 1. Downgrade iOS without iTunes via iMaster
- Way 2. Downgrade iOS without iTunes via Finder
- Way 3. Downgrade iOS without iTunes via TinyUmbrella
- Part 2. [Before iOS Downgrade] How To Backup iPhone Before Downgrading?
- Part 3. [After iOS Downgrade] How To Restore iPhone From Backup After Downgrading?
Part 1. How to Downgrade iOS Without iTunes?
If it is difficult for you to downgrade iOS with iTunes, now imagine doing so without iTunes. Thankfully, there is some leeway that can be exploited to implement the iOS downgrade without using iTunes. Here are 3 methods to do just that.
Way 1. Downgrade iOS without iTunes via iMaster
iMaster is a good choice if you want to downgrade iOS without jailbreaking or losing any data. As the most popular iOS downgrade tool in recent years, it can quickly downgrade iPhone to any supported iOS version with a few simple steps, making the iOS downgrade process super easy.
How to Downgrade iOS without iTunes via iMaster?
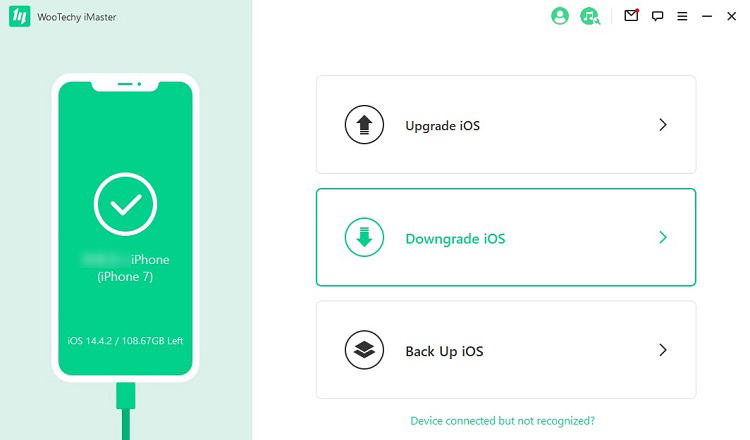
Step 1. Download, install and launch iMaster on your computer. Then connect your iOS device with USB cable and click Downgrade iOS.
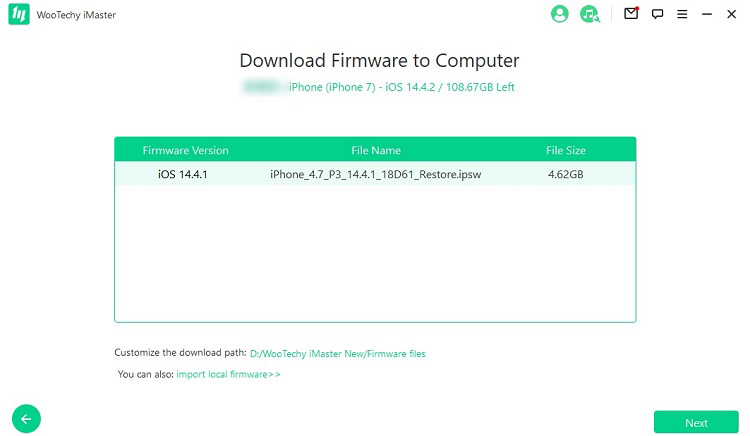
Step 2. Select the firmware version you want to downgrade to, click Next to download it.
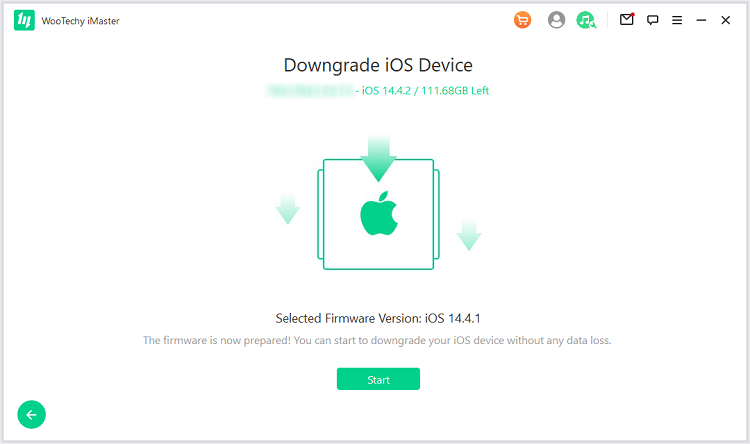
Step 3. Once the firmware is downloaded and verified, click Start to begin the downgrade process.
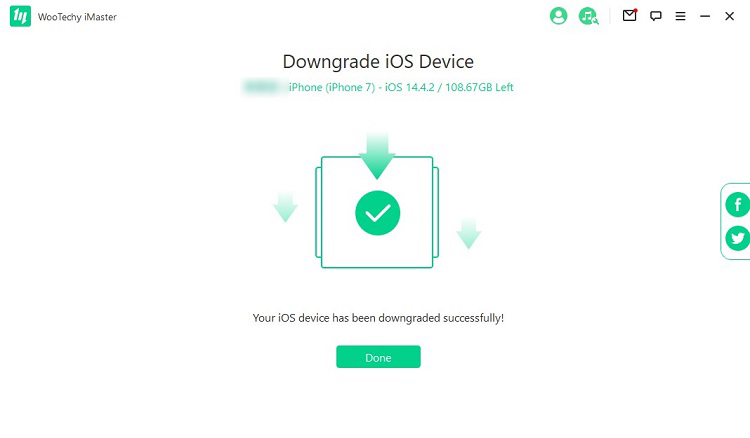
Step 4. When the downgrade is complete, click Done. Now your iOS device has been downgraded successfully!
Try For Free
Secure Download
Try For Free
Secure Download
Way 2. Downgrade iOS without iTunes via Finder
Finder is another popular method to downgrade iOS without iTunes. However, this method only works on Macs. If you only have a Windows computer, you won't be able to use this method, turn to iMaster above.
How to Downgrade iOS without iTunes via Finder?
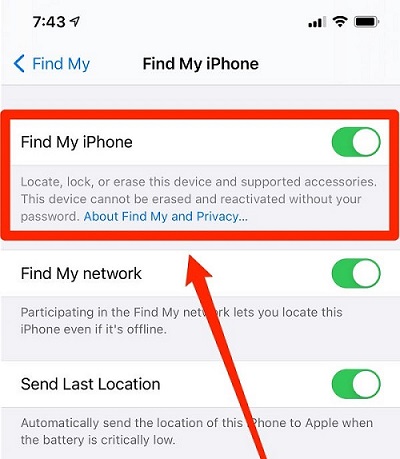
Step 1. Disable Find My iPhone.
Go to Settings, tap your name at the top of the display, then click Find My > Find My iPhone and tap the toggle next to Find My iPhone to disable the feature.
Step 2. Download the Right Restore Image.
Download the right restore image for the older version you intend to downgrade to and your phone model.
Step 3. Connect your iOS Device to Your Computer.
Once the download is over, connect your iOS device to your computer with a USB cable.
Step 4. Open Finder.
If you are running macOS Catalina (10.15 or later) or macOS Big Sur (11.0 or later), you can open the Finder app if it doesn't open automatically to your iOS device. Click on your iOS device's name under Locations in the sidebar. You can move to the next step if you can't find it.
Step 5. Trust the Computer.
After choosing your iOS device, click the Trust button that comes up. A prompt will appear on the display of your iPhone. Tap Trust, then enter the passcode of your device to grant your computer rights to access the data on your device.
Step 6. Install the Older iOS Version.
On the General screen. Hold down the Option key, then choose either Check for Update or Restore iPhone.
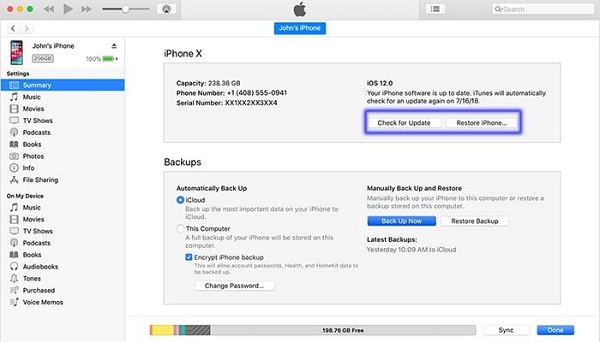
With Check for Update, you could try to downgrade your device with your data intact. You might encounter some problems later because you are downgrading to an iOS version that might be incompatible with some features on the device.
That is why you might want to choose Restore iPhone, which starts the process from scratch. You can then restore the device using your iCloud backup.
After choosing an option, a file browser pop-up will appear. You then click on the restore image to complete the process. Keep your device connected to the computer until the process is over.
Way 3. Downgrade iOS without iTunes via TinyUmbrella
Another way to downgrade iOS without iTunes is to use TinyUmbrella.
How to Downgrade iOS without iTunes via TinyUmbrella?
Step 1. Download and install the TinyUmbrella app.
Step 2. Start the Tiny Umbrella app. Connect your iOS device to a computer using a USB cable. The TinyUmbrella app should detect the device automatically.
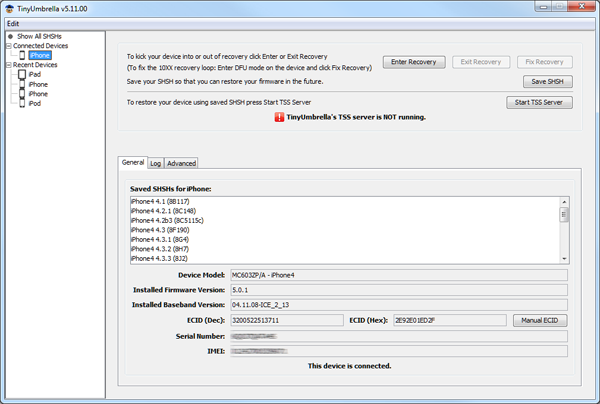
Step 3. Click on the "Save SHSH" button, which allows you to save the 126-bit encryption onto the device.
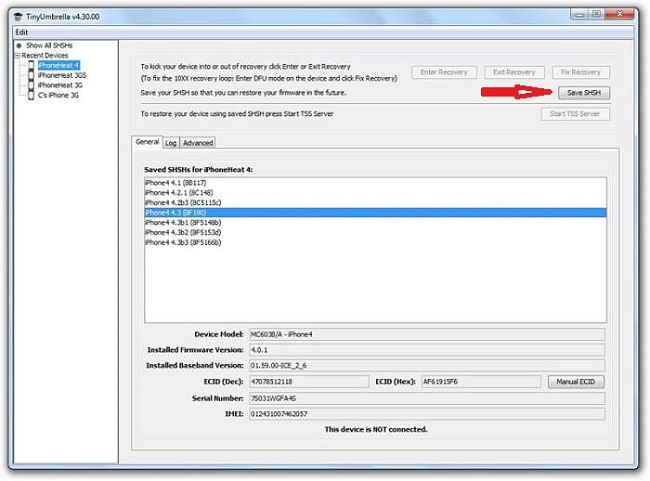
Step 4. There is a button right under the "Save SHSH" blob linked to the TSS server. Click "Start TSS Server" to proceed with the process.
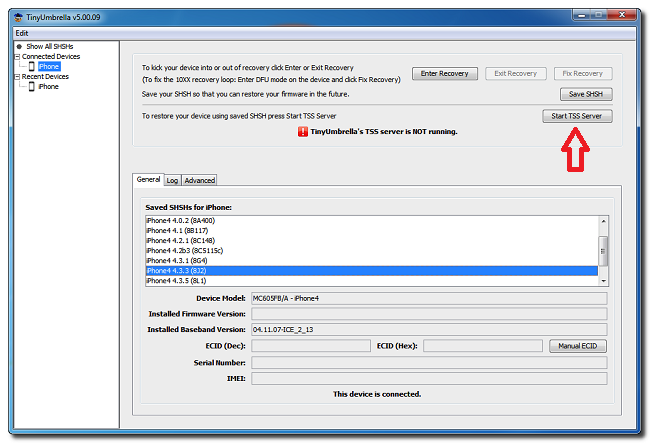
Step 5. You will receive an error 1015 message after the server has finished running the process. You can then move on to the Exit Recovery under the recovery devices option:
Step 6. You then proceed to the advance option to uncheck the highlighted box and complete the process.
After completing the firmware downgrade process, you will need to save the SHSH blobs and then restart the device to automatically downgrade the firmware.
Part 2. [Before iOS Downgrade] How to Backup iPhone Before Downgrading?
iOS downgrade is like a factory reset that erases all the existing data on your iOS device before installing the older version of iOS. Therefore, it's very important to backup iPhone, which is the first thing you must do before you start downgrading iOS. Here are 2 fast and simple ways for you to do it.
Way 1. Backup iPhone with iCloud
iCloud backup is the official method and one of the most common, and you can even set iCloud to automatically back up your iPhone daily.
How to Backup iPhone with iCloud?
Step 1. Connect your iOS device to a Wi-Fi network.
Step 2. Click on Settings, click on your name, and then click on iCloud. For iOS 10.2 versions or earlier, click on the iCloud icon in your iPhone Settings.
Step 3. Select iCloud Backup. For an iOS 12 version or earlier, click on Backup.
Step 4. Select Back Up now and maintain the connection to your Wi-Fi network until you have completed the backup process.
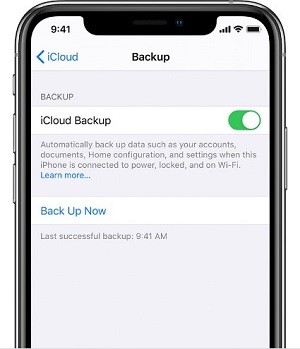
Once the backup process is complete, go to the iPhone Settings on your device, then click on your name, then iCloud. You click on iCloud storage and tap on Manage storage, where you see details for the last backup.
With iOS 12 and earlier, click on iCloud in the iPhone Settings, then Storage before clicking on Manage storage.
Note
There is no denying the fact that back up iPhone via iCloud is slow and time consuming. On top of that, iCloud only has a very limited amount of free storage space, so if your backed up data exceeds the available storage space, then you will need to spend a hefty amount of money to purchase it.
Way 2. Backup iPhone via iMaster
If you want to back up your iPhone data for free and without storage limitations, then you can use iMaster to do so. As the best alternative to iCloud backup, it has now become a must-have for many iPhone users. It's a professional and popular free iPhone backup tool that is easy to use and allows you to quickly back up iOS in just a few clicks.
How to Backup iPhone with iMaster?
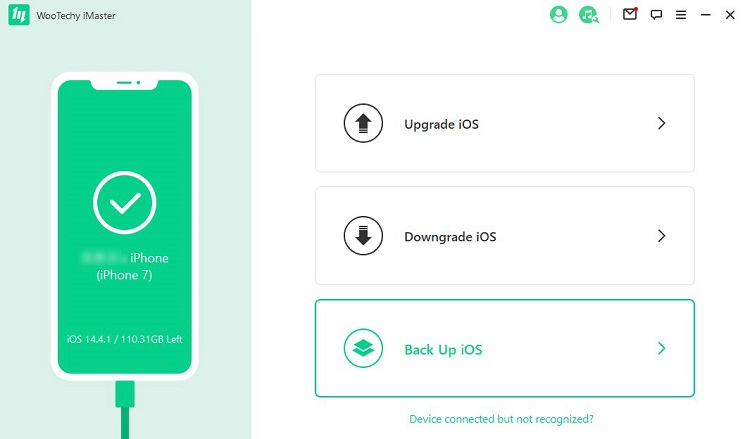
Step 1. Download, install and launch iMaster on your computer. Then connect your iOS device to computer and click Back Up iOS mode after the device is recognized.
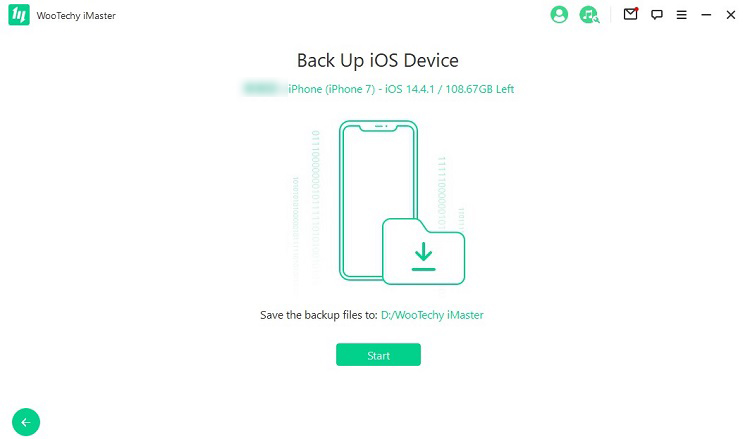
Step 2. Choose a storage location to save the backup file and click Start to back up your iPhone data.
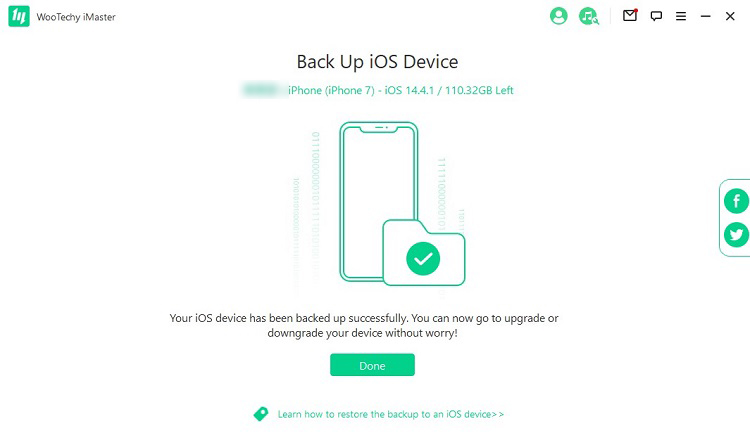
Step 3. Once backup process is complete, click Done. Now your entire iPhone data has been backed up on your computer successfully!
Free Trial
Secure Download
Free Trial
Secure Download
Part 3. [After iOS Downgrade] How to Restore iPhone From Backup After Downgrading?
After the iOS downgrade is complete, the last step is to restore iPhone from a backup. Here are still 2 ways to do it.
Way 1. Restore iPhone From Backup with iCloud
If you have used iCloud to back up your iPhone before, then you can go to iCloud to restore iPhone from iCloud backup.
How to Restore iPhone From Backup with iCloud?
Step 1. Open your browser and go to iCloud.
Step 2. Type in your iCloud account password, then press Enter on your keyboard to continue.
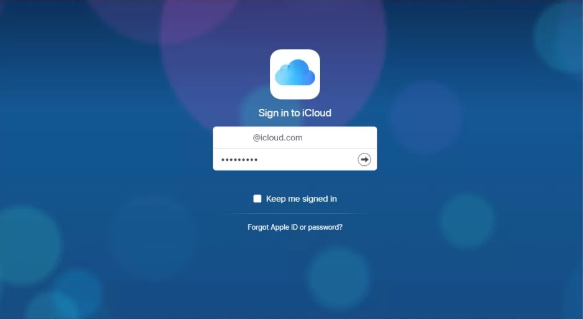
Step 3. You will see the interface as follows. Here, for instance, if you want to recover photos in the iCloud backup file, you should click on Photos in this interface to continue.

Step 4. You will enter the interface with iPhone photos listed there. Then you can click on the target photo to select it, and click the download button to download it to your computer.
Step 5. You will find your recovered data in a separate gallery. You can then select the files you'd like to recover before clicking on Restore to Device to the iCloud backup after the downgrade.
Way 2. Restore iPhone From Backup with iMaster
Yes, iMaster can also help you to backup restore. It performs quite well in iOS upgrade, iOS downgrade and iOS backup, you can also use it to restore your iPhone from backup quickly.
How to Restore iPhone From Backup with iMaster?
Step 1. Launch iTunes on your PC or Mac and connect your device to the computer with a USB cable.
Step 2. Click on the Apple icon when it appears in iTunes, then select "Restore Backup" in the "Summary" module.
Step 3. Choose the backup file made by iMaster, then click "Restore" and wait for the restore process to complete.
Conclusion
Downgrade iOS can be daunting for newbies. Thankfully, this article provides the top 3 easy ways on how to downgrade iOS without iTunes. Needless to say, iMaster should be your best choice when you want to downgrade iOS without using iTunes. It even takes care of backing up your iPhone before downgrading iOS and restoring your backup after downgrading iOS! Just try it for free today!
WooTechy iMaster - Best Tool to Downgrade iOS

75,000,000+
Downloads
- iOS Downgrade: Downgrade iPhone/iPad to any supported iOS version without data loss
- iOS Upgrade: Upgrade iPhone/iPad to the latest iOS version for 100% free
- iOS Backup: Backup all iPhone/iPad data without any storage limitation
- Easy To Use: Simple steps, no specialized technical knowledge required
- Multi-Language Support: Support for English, Spanish, French, German, Chinese, Japanese, etc
- After-Sales Guarantee: 30-day money back policy with instant refund if unsuccessful
Try For Free
Secure Download
Try For Free
Secure Download


